PML User Manual
|
PML Version |
4.0.0 2023-02-23 |
|
License |
|
|
Author |
Christian Neumanns |
|
Website |
|
|
PML Markup Code |
Introduction
This manual is about creating web articles and books with the Practical Markup Language (PML).
If you have questions or suggestions then please post a message on GitHub discussions, or send an email to contact {at} pml-lang {dot} dev.
Quick Start
After installing PML, you can create a web document in three easy steps:
-
Create a PML file using any editor
-
Convert the PML file to an HTML file
-
Open the HTML file in your browser
Here is an example of how to proceed:
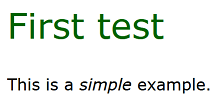
Use your preferred text editor to create a text file named example.pml in any directory of your choice, and with the following content:
[doc [title First test]
    This is a [i simple] example.
]Open a terminal in the directory of file example.pml.
Note
For instructions on how to do this in Windows, search for "open a terminal in Windows", or refer to this article.
Convert the PML file into an HTML file named example.html by entering the following command:
pmlc PML_to_HTML example.pml
Note
Alternatively you can also type:
pmlc p2h example.pml
By default, the resulting HTML file is written to directory output of your current working directory (i.e. output/example.html).
Here is an example of a terminal session in Windows:
C:\tests>pmlc p2h example.pml
INFO: Creating HTML file 'output\example.html'.
C:\tests>
Open file output/example.html in your browser. The result looks like this:
Tips
To see the list of options you can use with command PML_to_HTML, refer to chapter Convert PML to HTML in PMLC Commands Reference Manual. This manual also lists all other commands you can use with pmlc.
For general help type:
pmlc -h
Anatomy of a PML Document
Document Tree
Technically speaking, a PML document is a tree composed of PML nodes.
Here is a visual representation of the tree structure of a simple PML document:
-
document
-
chapter
-
title
-
paragraph
-
paragraph
-
paragraph
-
-
chapter
-
title
-
paragraph
-
image
-
-
The above document has two chapters. The first chapter is composed of a title and three paragraphs. The second chapter contains a title, a paragraph, and an image.
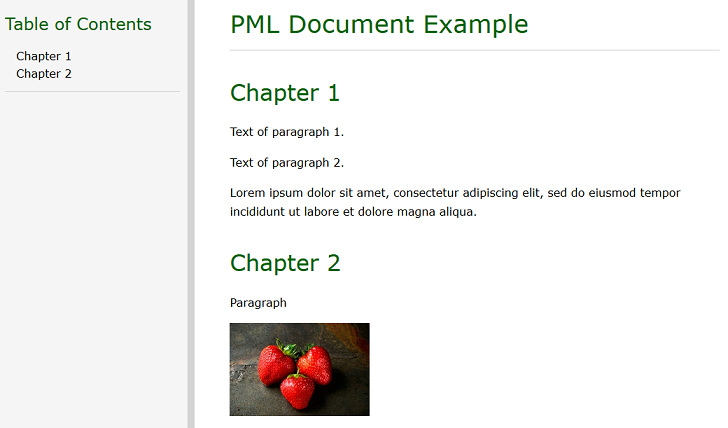
A real document having the above structure would look like this:
[doc [title PML Document Example]

    [ch [title Chapter 1]

        Text of paragraph 1.

        Text of paragraph 2.

        Lorem ipsum dolor sit amet, consectetur adipiscing elit, sed do eiusmod tempor incididunt ut labore et dolore magna aliqua.
    ]

    [ch [title Chapter 2]

        Paragraph

        [image source = images/strawberries.jpg]
    ]
]
File example.pml can be converted to file output/example.html with the following command:
pmlc p2h example.pml
Note
The above PML document uses image file images/strawberries.jpg. By default, all resources used in a document are located in directory resources. Therefore file resources/images/strawberries.jpg must exist before executing the above command.
Now file output/example.html can be opened in the browser, and the result looks like this:
Nodes
There are different types of nodes in a document tree.
A node's type is determined by a name. For example:
-
A chapter node has the name
ch, and represents a chapter of an article or book. -
An
imagenode represents an image to be inserted in the document. -
An italic node has the name
i, and is used to write text in italics.
Every node in a document starts with [ and ends with ]. The node's name (always required) is written immediately after the opening [, without a space (e.g. [doc ... ] or [ch ... ]).
A node can be empty (it has a name, but no content), contain only text, or contain a mixture of text and child nodes. A node's name and its content are separated by a whitespace character (a space, TAB, or new line). Here are three examples:
[nl]
[i node containing only text displayed in italics]
[p A [i simple] paragraph with [b six] words.]
The full list of nodes is documented in the PML Reference Manual.
Attributes
Some nodes have attributes.
Some attributes are required, and some are optional.
For example, the image node has a required attribute named source, which defines the image's file path. Moreover it has some optional attributes, such as width and height, to explicitly define the image's dimensions in pixels. Here is an example of an image node with values assigned to attributes source and width:
[image ( source="images/juicy apple.png" width="400" ) ]As we can see:
-
Attributes are enclosed in parentheses:
( ... ) -
The syntax
name = "value"is used to assign a value to an attribute. For example:width="400" -
Attribute assignments are separated by whitespace (a sequence of one or more spaces, tabs, and/or new lines). No comma is needed:
(a1="v1" a2="v2")
        ^
The list of available attributes for each node is documented in the PML Reference Manual.
HTML Attributes
HTML attributes can optionally be specified for some nodes.
This is used to explicitly set HTML attributes in the resulting HTML code. The most frequent use of HTML attributes is to explicitly set the style for a specific element.
An HTML attribute name starts with html_, followed by the real HTML attribute name. Thus, to specify a style attribute in the resulting HTML code, you would write for example: html_style="color:red;". Any valid CSS can be assigned to a html_style attribute.
Suppose we want to write a paragraph in red letters, surrounded by a blue dashed border. We can do it like this:
-
PML code:
[p (html_style = "color:red; border:1px dashed blue") It is important to note that ... ] -
Result:
It is important to note that ...
-
Generated HTML code:
<p class="pml-paragraph" style="color:red; border:1px dashed blue">It is important to note that ... </p>
To see if HTML attributes are allowed for a given node, please refer to the PML Reference Manual.
To see the list of attributes supported for a given node, please refer to the official HTML specification. PMLC does not check if an HTML attribute is valid.
Text Processing
A PML document is written using the PDML syntax. Therefore, all features available in PDML are also supported in PML. You can refer to PDML's documentation to get more information about PDML. In this chapter, we'll have a look at some PDML features that are often used in PML documents.
Lenient Parsing
The following rules are applied to make the syntax more concise:
-
If a node can only have attributes (no child nodes) the parenthesis around attributes can be omitted.
For example, the
imagenode has no child nodes. Therefore, instead of writing:[image ( source="images/juicy apple.png" width="400" ) ] ^ ^... we can also write:
[image source="images/juicy apple.png" width="400" ] -
Quotes around attribute values can be omitted if the value does not contain:
-
whitespace (a space, tab, carriage return or line feed)
-
any of the following characters:
[ ] ( ) " '
Hence, instead of writing:
width="400"
      ^   ^
... we can write:
width=400 -
-
If a node in a PML document has no attributes, it is not necessary to explicitly state the absence of attributes by writing
(). Hence, the following code:[div () text] ^^... can be shortened to
[div text]However, if the node's text starts with
(, then()is required.Say we want to render the text: (organic = healthy). In that case we can't write:
[i (organic = healthy)]... because the parser would interpret this as an attribute assignment (i.e. the value
healthyassigned to attributeorganic.To eliminate the confusion we have to write:
[i() (organic = healthy)]
  ^^
If we apply all above rules, then this code:
[image ( source = "images/juicy apple.png" width = "400" ) ]... can be shortened to:
[image source="images/juicy apple.png" width=400]Whitespace Handling
PML uses whitespace handling rules that aim to be intuitive and practical. It is important to be aware of these rules, because ignoring them can lead to surprising or unwanted results, especially in edge cases.
As there is no standard and unique definition for whitespace, we first need to define some terms used in the context of PML:
-
Whitespace character
There are four whitespace characters:
Name C-style syntax Unicode Space ' ' U+0020 Tab '\t' U+0009 Carriage return '\r' U+000D Line feed '\n' U+000A -
Whitespace
The term whitespace is used to denote any sequence of one or more whitespace characters. For example: 4 spaces, followed by two tabs and a new line.
-
New line
New lines are defined differently in Unix and Windows. Unix uses a single
line feed(LF). Windows uses acarriage return, followed by aline feed(CRLF).New line rules in PML depend on whether PML is reading or writing text.
When PML reads text, it supports both new line variations (LF and/or CRLF) correctly on Unix and Windows systems, even if a single document uses a mixture of Unix/Windows new lines.
When PML writes text (e.g. a HTML file) it uses the operating system's canonical new line (CRLF on Windows, LF on Unix).
Whitespace is handled differently in nodes and attributes, as explained in the following chapters.
Nodes
Whitespace in nodes is handled as follows:
-
Whitespace reduction
Whitespace in text is replaced by a single space character.
Writing
this     is
text
... is the same as:
this is textTo preserve a sequence of several whitespace characters, the node sp can be used to explicitly insert non-breaking spaces, and the node nl can be used to explicitly insert new lines, e.g.:
this[sp][sp][sp][sp][sp]is[nl]text... is rendered as:
this is textMoreover, the monospace node can be used to insert a block of text in which whitespace is preserved (similar to the
pretag in HTML):[monospace this is text ] -
Paragraph breaks
A sequence of two consecutive new lines generates a paragraph break.
Writing:
Paragraph 1.

Paragraph 2.
... is the same as:
[p Paragraph 1.]
[p Paragraph 2.]
... and is rendered as:
Paragraph 1.

Paragraph 2.
However, writing:
Paragraph 1.
Paragraph 2.
... would be the same as
[p Paragraph 1. Paragraph 2.]... and is rendered as:
Paragraph 1. Paragraph 2. -
Whitespace removal
-
Leading and trailing whitespace in an auto-generated paragraph is removed.
-
An auto-generated paragraph containing only whitespace is removed.
-
-
Whitespace does not define structure
Adding or removing whitespace characters in a whitespace segment does not alter a document's structure. Hence, whitespace can be used freely to make documents more readable or visually more appealing.
For example, instead of writing:
[doc [title Doc Title]
[ch [title Chapter 1] text]
[ch [title Chapter 2] text]
]
... we can make the structure easier to grasp like this:
[doc [title Doc Title]

    [ch [title Chapter 1]
        text
    ]

    [ch [title Chapter 2]
        text
    ]
]
Attributes
Whitespace in attributes is handled as follows:
-
Whitespace elimination
Whitespace around attribute symbols (
(,), and=) is ignored. The following threeimagenodes are semantically equivalent:[image ( source = "images/juicy apple.png" width = "400" height = "200" ) ] [image(source="images/juicy apple.png" width=400 height=200)] [image ( source = "images/juicy apple.png" width = 400 height = 200 ) ] -
Whitespace in attribute values
As stated already, unquoted attribute values cannot contain whitespace. Instead of writing
color = light orange, we must writecolor = "light orange"On the other hand, quoted attribute values can contain whitespace (any sequences of spaces, tabs, and new lines). Whitespace within a quoted value is preserved.
Suppose we want to assign the following value to attribute
quote:He said: "She said: 'Wow!'"This can be achieved with:
quote = "He said:
   \"She said: 'Wow!'\""
Unix and Windows new lines are supported in attribute values.
Unix or Windows new lines can be enforced by using escape sequences. For example, to force Windows new lines in the above example, we can write:
quote = "He said:\r\n \"She said: 'Wow!'\""
Escape Characters
Character escape rules in node text and attribute values are slightly different, as explained in the following chapters.
Nodes
As seen already, characters [ and ] define the start and end of a node.
Therefore, if these characters are used in text, they must be escaped, to avoid confusion. This is done by prefixing the character with a backslash (\). For instance, instead of writing [, we have to write \[.
As a backslash is used as escape character, it must itself also be escaped when it is used in text. Hence, instead of writing \, we have to write \\.
Here is an example to demonstrate how escaping works:
-
PML code:
File path = C:\\tests\\example.txt Instead of writing \\, we have to write \\\\ Instead of writing \[, we have to write \\\[ -
Result:
File path = C:\tests\example.txt
Instead of writing \, we have to write \\
Instead of writing [, we have to write \[
The final rule is simple: Characters [, ], and \ must be preceded by \ when they are used in normal text.
Besides characters that must be escaped, there are also characters that can be escaped if desired, as shown in the following table:
| Character or name | Escape sequence | Mandatory |
|---|---|---|
| \ | \\ | yes |
| [ | \[ | yes |
| ] | \] | yes |
| Tab | \t | no |
| Carriage return | \r | no |
| Line feed | \n | no |
| Unicode escape 4 hex digits | \uhhhh (e.g. \u2764 for "heart shape": ♥) | no |
| Unicode escape 8 hex digits | \Uhhhhhhhh (e.g. \U0001F600 for "grinning face": 😀) | no |
Attributes
Escape sequences are not supported in unquoted attribute values.
If an attribute value is quoted, the following escape sequences are supported:
| Character or name | Escape sequence | Mandatory |
|---|---|---|
| " | \" | yes |
| \ | \\ | yes |
| [ | \[ | no |
| ] | \] | no |
| Tab | \t | no |
| Carriage return | \r | no |
| Line feed | \n | no |
| Unicode escape 4 hex digits | \uhhhh (e.g. \u2764 for "heart shape": ♥) | no |
| Unicode escape 8 hex digits | \Uhhhhhhhh (e.g. \U0001F600 for "grinning face": 😀) | no |
Example: Suppose we want to assign the value C:\temp\test.txt to attribute path. In this case the value can be quoted or unquoted. If the value is quoted then \ must be escaped:
| Quoted: | path = "C:\\temp\\test.txt" |
| Unquoted: | path = C:\temp\test.txt |
Parameters
Sometimes the same text or markup code appears several times in a document. In such cases you can use a parameter to avoid retyping or copy/pasting the same text again and again.
A parameter is composed of an identifier (unique name) and a value. The syntax for assigning a value to a parameter is:
[u:set name = value]Note the mandatory u: before the node name set. The prefix u: defines a namespace with identifier u, which stands for utility node. This is necessary to make a distinction between normal PML nodes that contain text, and other nodes that are used to handle text (text processing).
The value assigned to a parameter can be re-used in the document with the following syntax:
[u:get name]Here is an example of a URL that is re-used two times.
-
PML code:
[u:set docs_root_URL = http://www.example.com/project/docs/public] For an overview please read the article [link (url=[u:get docs_root_URL]/concepts.html ) Basic Concepts]. For detailed information please refer to the [link (url=[u:get docs_root_URL]/user_manual.html ) User Manual]. -
Result:
For an overview please read the article Basic Concepts.
For detailed information please refer to the User Manual.
You can define any number of parameters, anywhere in the document. Parameters are often defined at the beginning of the document, just after the doc node. After declaring a parameter, its value can be re-used any number of times in the document.
After assigning a value to a parameter, its value cannot be changed later in the document. Parameters are like constants in programming languages.
The syntax rules for assigning values to parameters are the same as those for attributes (lenient parsing, whitespace handling, and character escapes).
A parameter identifier must start with a letter or an underscore, and can be followed by any number of letters, digits, underscores, hyphens, and dots. Note for programmers: The regex of an identifier is: [a-zA-Z_][a-zA-Z0-9_\.-]*. Identifiers are case-sensitive. The following identifiers are all different: name, Name, and NAME.
You can assign several parameters in a single set node. For example:
[u:set
    color = "deep blue"
    default_width = 300
]
Besides assigning simple text snippets to parameters, you can also assign markup snippets to re-reuse. Imagine, for example, that a company logo needs to be inserted several times in the document. Suppose that the markup code to be inserted is:
[image source=images/company_logo.png width=200 height=200 border=yes]Re-inserting this code several times would be cumbersome. Worse, it would be hard to maintain. For example, if the logo's dimensions are changed later, the change must be done everywhere the node is used. These inconveniences can easily be eliminated by using a parameter. Here is the code to define the code once and re-use it two times:
[u:set company_logo = "[image source=images/company_logo.png width=200 height=200 border=yes]"]
...
[u:get company_logo]
...
[u:get company_logo]
If the dimensions are changed later, you just need to make the change at one place.
Parameters can use other parameters that have already been defined in the document. For example, you might want to define a common root directory once, and re-use it in the definition of subsequent parameters:
[u:set root_directory = /foo/bar/]
[u:set images_directory = "[u:get root_directory]images"]
[u:set examples_directory = "[u:get root_directory]examples"]

[p Images: [u:get images_directory]]
[p Examples: [u:get examples_directory]]
This is rendered as:
Images: /foo/bar/images
Examples: /foo/bar/examples
File Splitting
If you create a big document, it is useful to split it up into several files, instead of having one big file that contains all the text. For example, each chapter could be defined in a separate pml file.
The syntax to insert a pml file at the current location is:
[u:ins_file path = file_path]file_path can be an absolute or relative path. If it's a relative path, it's relative to the directory of the pml file in which ins_file is used.
Example
Suppose we create a PML document composed of two chapters. We want each chapter to be defined in its own file, in sub-directory chapters (relative to the main document).
-
PML code:
We create file
chapters/chapter_1.pmlwith this content:[ch [title Chapter 1] blah blah blah ]We also create file
chapters/chapter_2.pml:[ch [title Chapter 2] blah blah blah ]The main file
book.pmlis defined like this:[doc [title Book] [u:ins_file path = chapters/chapter_1.pml] [u:ins_file path = chapters/chapter_2.pml] ] -
Result:
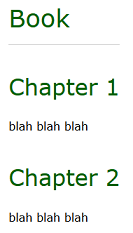
Table of Contents
By default, a table of contents (TOC) is created on the left side of the HTML page, as shown before.
The TOC is automatically created based on the chapters defined in the document. As chapters can be nested, the TOC results in a tree, which the user can expand or collapse. When the document is first displayed, all TOC chapters beyond level 1 are collapsed. Only chapters of level 1 are displayed. The user can then expand chapters and sub-chapters, and click on a chapter's title to see its content.
PML's default behavior for the TOC can be customized with the following options:
-
TOC_title: change or remove the title displayed at the top of the TOC -
TOC_position: define the TOC's position. Allowed values are:-
left: Display the TOC at the left side. This is the default value. -
top: Display the TOC at the top of the document, after the document's title. -
none: Don't display a TOC.
-
-
TOC_max_level: the maximum chapter level that is included in the table of contents. Chapters with a higher level are excluded from the TOC.
Here is an example of using an options node to set the TOC's title to "Inhaltsverzeichnis", display the TOC at the top, and include only chapters up to level 4:
[options
    [TOC_title Inhaltsverzeichnis]
    [TOC_position top]
    [TOC_max_level 4]
]

[doc [title TOC test]
    lorem ipsum tralala ...
]
Customization
A major goal of PMLC is to give you full control over how PML documents are converted to HTML or other formats. Therefore PMLC provides several features allowing you to partially or fully customize the conversion process, so that the target document's look and feel honors your preferences and specific requirements.
Customization is currently supported in the following ways:
-
A set of options that can be specified at the command line, in the PML document, or in a shared options file.
-
HTML Attributes.
-
Customized CSS files to style the HTML document.
-
User-defined nodes that allow you to add new nodes to PML, or to override PML's standard nodes.
Options
To see the list of options available when a PML document is converted to HTML, please refer to section "Input Parameters" in chapter Convert PML to HTML of the PMLC Commands Reference Manual.
When PMLC executes command PML_to_HTML, it looks for options in the following order:
-
If the value for an option is explicitly specified as a command line argument, then this value is applied. Options defined on the command line always have highest priority.
For example, the title and position for the table of contents can be explicitly defined on the command line like this:
--TOC_title "Book Content" --TOC_position top
-
If no value is specified on the command line, then PMLC looks for a value specified within an
optionsnode in the PML document. If a value is found then this value is applied.The
optionsnode must be defined before thedocnode.For example, the title and position for the table of contents can be defined in the PML document as follows:
[options [TOC_title Book Content] [TOC_position top] ] [doc [title Options Example] text ... ] -
If a value is neither specified on the command line nor in the PML document, then PMLC looks for a value specified in a shared options file.
The relative path of this file is
config/PML_to_HTML/options.pdml. The file's root directory depends on the operating system. For example, on Windows it is normally a subdirectory of%APPDATA%. To know the exact location on your machine, you can run commandpmlc infoin a terminal. Then look for the field labeledShared data dir., which shows the root directory. A typical value on Windows would beC:\Users\Albert\AppData\Roaming\PMLC_3.0\. In this case the full path of the options file would be
C:\Users\Albert\AppData\Roaming\PMLC_3.0\config\PML_to_HTML\options.pdmlNote that file
config/PML_to_HTML/options.pdmlis itself optional. If it doesn't exist, you need to create it manually to store shared options.If the file exists, and a value is found for an option, then this value is applied.
The content of the file is the same as the
optionsnode in a PML document.For example, the default title and position for the table of contents can be defined as follows:
Fileconfig/PML_to_HTML/options.pdml[options [TOC_title Book Content] [TOC_position top] ]Tip
You should consider using the
options.pdmlfile for options that are needed in most or all of your PML documents. Defining options in the sharedoptions.pdmlfile eliminates the need to repeat the same options again and again in different PML documents or as command arguments. -
If a value is neither specified on the command line, nor in the PML document, nor in a shared options file, then PMLC applies a hard-coded default value.
Note
Option input is only supported as a command line argument. This option cannot be used in a PML document or in a shared options file.
HTML Attributes
If you want to change the style of a single node, you can define an HTML attribute for that node, as explained previously. You can assign any valid CSS to the node's html_style attribute, or you can use an html_class attribute.
Besides customizing CSS, HTML attributes defined for a PML node can also be used to set other HTML attributes in the target HTML document.
Please refer to chapter HTML Attributes for more information.
Customized CSS
Option CSS_files can be used to specify one or more customized CSS files to be applied in the final HTML document. For more information, please refer to parameter CSS_files in section "Input Parameters" of chapter Convert PML to HTML.
Each tag in the final HTML document has a class attribute. Hence, the class value can be used in any CSS file to style the HTML node. All CSS class names used in PML are prefixed with pml-, so that PML styling doesn't interfere with other styling rules that might exist in the final HTML page.
For example, the document title's class is pml-doc-title. Hence, to change the appearance (font, size, color, etc.) of the document's title, you can apply any CSS rule to class pml-doc-title in a CSS file.
If you want to change the style just for an individual node, you can use the html_style attribute, as seen already. Alternatively, you can define an identifier for the node, and then use the identifier in the CSS file to change the style.
For example, to display a single paragraph with a yellow background, you would write the following PML code:
[p (id = my-id)
    This text is displayed on a yellow background.
]
Then you can add the following rule in a CSS file:
#my-id {
    background-color: yellow;
}
Result:
This text is displayed on a yellow background.
User-Defined Nodes
Please refer to chapter User-Defined Nodes for more information.
Comments
A comment starts with
[-and ends with-]. Comments can appear anywhere, and they can be nested to any level. Text within comments is ignored.Example: